Email changes

Hello email subscribers!

I just wanted to let you know that Karen’s Up On The Hill is moving in order to perform better for all you readers!

I am still tweaking some things, but the only change to you is that you will receive an email asking you to confirm and re-follow the blog. I sure hope you do!

Thank you so much for being a follower & sorry for any inconvenience.

Have a great day, and I’ll see ha in the next post!

Karen

Glitter Pears

image
This weekends easy project was to add glitter to some old faux pears to give them an update for the holidays.

I will be using them from Thanksgiving thru Christmas

image

All I had to do,

was take pears I have had for years, and spray them with an adhesive spray and sprinkle with glitter.

 I am all about low cost and low time commitment crafts. This was both. I used inexpensive gold and copper glitter and Elmer’s spray glue and it took maybe 30 minutes.

I sprayed each pear one by one ( outside on the porch, with gloves on, that stuff is super sticky!) and then brought each one in and sprinkled glitter aground most of it.

image

image

My little biscuit kept me company until he got bored.

image

I didn’t worry about the glitter being perfect or the same on each one, it doesn’t have to be perfect to be pretty.  I just did a nice dusting to make them festive for the holidays.

I also added glitter to a white “S” initial (for our last name) that was just lying around in a drawer.

image

image

image

I think these colors are beautiful for Thanksgiving, don’t you?

For Christmas, I will add some candles or greens or both, which I think will be oh so pretty.  And I love things that can serve double duty from one holiday to the next!

small p

instagram

image

Sharing this on,

A Delightsome LifeGreen Willow PondSavvy Southern Style 

Home Work,  Cozy little House,  By Stephanie Lynn, Huckleberry Love, 

Autumn on the hill

image

Its early October and It’s starting to look like Fall.

Even though some of the leaves are turning red, some of the flowers are still holding on.

By the middle of November, the trees will be bare and it will be turning towards winter around here.

Lets enjoy the view while we have it, shall we….

These are some shots from the yard on yesterday’s cloudy day.

The top photo is part of the view from my Kitchen window ( shown here).

This next one is our back yard, or I should say, our dog’s back yard.

The metal sign on the fence is from Terrain. We actually have one of the two stores here, but this is the online.

image

Some of the florals around the place;

image

image

image

image

image

image

image

And this is part of the view from my living room window ( shown here) . The sun rises on this side of the house, so if you are an early bird, you can enjoy a beautiful sunrise everyday.

image

How are things looking where you live?

You can follow Up On The Hill here if you’d like:

Pinterest

Instagram

Facebook

And you can see a few photos of us in “About”

Wreath make over

image

While I was doing a small amount of Halloween decorating in the kitchen, and making some blackened jars for votives,

I also put together a Halloween wreath that I am using on our front door this year.

It has had a bit of a makeover….

Initially, this wreath was hot pink. Yup. Hot pink. I used it for Valentines day once, years ago. Since then it has been an attic dweller.

Having a light bulb moment, I pulled it out, dusted it off and changed it up to give it a new life.

Repurpose, reuse, recycle, y’all!

This is the color it was before the makeover, in all it’s pink glory.

image

image

All I had to do was give it a really good coat of spray paint (a can or so is plenty) making sure to get all the angles to cover the original color.  And I would suggest that you pre-fluff your wreath before spray painting, to avoid having to touch it up later.

This is the wreath after it was coated with Krylon black spray paint. Much better already.

image

image

When it was dry, I added 4 pieces of glittery Halloween Swag. I am a huge fan of all things glittery!

 I took apart the largest, the bat, to make 2 pieces out of it, and attached them with some floral wire.

The pieces cost one dollar or less each and the paint was about $3.50 per can, so total cost for the wreath was around $7.00. That is thrifty if I do say so myself!

Now, it has a shiny, festive new life!

image

image

image

Don’t forget you can follow Karen’s Up On The Hill on:

small p

&

instagram

I am sharing this on:

I’ll’ Mrs. Tori,  Uncommon Designs, Dwellings- The Heart of Your Home

Navy Wifey,  It’s OverflowingThoughts from AliceTatertots & JelloSerenity You 

Chic on a ShoestringFrench Country CottageDear Creatives

Savvy Southern Style, Imparting Grace,

A witch & whatnots

image

Hello October!

October celebrates my husbands birthday, our one year anniversary in this house and Halloween! What a fun month!

To get in the spirit of one of the most celebrated holidays of the year, without going over the top, I  put together a few festive things in the kitchen.

I made a centerpiece on the kitchen table with pumpkins I painted black, mixed in some fun trick-or -treaters (the only ones we will have), and placed them with some black & gold china.

image

image

image

image

Are these guys not adorable? And my china from my Mother-in-law is sooo pretty with all the black.

Then, I placed some printable Halloween art that I found on Pinterest, on the fireplace mantel.

I just printed them up, and popped them in some black frames I already had. It was a cost free touch, gotta love that!

If you would like to use these prints in your house, they are pinned on my “It’s Fall Y’all” board. I only used two, but it’s actually a set of 5 prints, even better!

image

image

Then,

I used my handy stencils (I have really gotten my monies worth out of them) to add some Halloween themed words on two chalk boards, one by the fireplace and one on a coat rack by the door.

image

image

And finally,

I added a spidery, mercury glass candle holder with a spicy scented candle that is made locally and smells amazing! A really good candle is a beautiful thing!

image

So, that’s how we are doing Halloween Up On The Hill this year.

Some simple touches of whimsy with a black theme. Easy on the spooky.

Happy Halloween y’all!

small p

or

instagram

I’m sharing this on,

A Delightsome Life

Green Willow Pond,  Savvy Southern Style, Cozy Little House

Lil Mrs. Tori, By Stephanie LynnHuckleberry LoveUncommon Designs,  Dwellings- The Heart of Your Home

Navy Wifey, It’s Overflowing. Thoughts from Alice, The Charm of Home

Tatertots & Jello, Serenity YouBe Different, Act Normal 

Chic on a shoestringFrench Country CottageDear Creatives

Imparting Grace, A Daily Cup of Mrs. Olson Rooted in Thyme 

Dwellings-The Heart of Your Home

Sincerely, PaulaSomeday CraftsElephants & Ivy

Life on Lakeshore Drive

 The Winthrop ChroniclesCedar Hill Farm


A girl and a cow

image

Friday I went to lunch and did a little shopping with a gal pal of mine.

She took me to some local shops in her neighborhood that I had not been to before. I was happy to pick up a few doodads & what nots and was having a lovely time.

Then, it got even better. I saw this original piece of art by a local artist.

A cow in the snow, oil on canvas, with a frame made from barn wood by the Amish.

It was love at first sight, but I had to think it over for a minute. She was expensive. More than a piece of furniture expensive. I had to be sure I had a good place to put her and I didn’t NEED her, but I really wanted her.

Ok, enough thinking, she was an investment and I would have her forever.

Sold.

The ladies at the shop wrapped her up, and I brought her home.

I had three places in mind. First I tried her in the kitchen, but she got “lost” in there. Then I tried the second spot, the hallway, and that was it.

I took everything off the wall to accommodate her. She is not large enough to fill it herself, so I had to add some other pieces. Shopping my house, this is what I came up with…for now….

Simple Ironstone and naturals (as to not take any attention away from her) over a bench my Father-in-law made me several years ago. With a picture of my dog (that just passed) in the ocean and some antique doorknobs thrown in a bowl.

I think the whites and browns help the amazing blues in the painting stand out. What do y’all think?

image

image

image

image

small p

instagram

I’m sharing this on,

Dwellings- The heart of your Home, Shabby Art Boutique

Thoughts from Alice, French Country Cottage, Imparting Grace

Rooted in ThymeElephants & Ivy ,The Newlywed Pilgrimage,

Savvy Southern StyleThe Winthrop ChroniclesCedar Hill Farmhouse,

The Heathered NestA Stroll through LifeA cozy little house

image

image

image

Thrifty goodness

image

I recently stopped stopped by the Habitat for Humanity Restore near my house and found some lovely plates, platters and bowls, all for $12.00.

It’s great to find little inexpensive treasures and even better when the money you spend goes to a good cause. If you are unfamiliar, Habitat’s is used to build homes locally and around the world.

I also stopped in another shop next door to the restore, and found a pretty little tureen.

image

image

The white bread plates were about $4.00 for five of them. I usually only need four at a time, so being short was not a problem. They are so pretty and the white will mix & match with anything.

The Blue and White Currier & Ives Ironstone plate was $2.00. I don’t collect the blue and white, but it’s so lovely I thought I could use it for something this holiday. And I needed to spend over $10.00 to use my debit card.

The plates also had a small matching platter that I grabbed and I also found an old Digoin & Sarreguemines serving bowl for $2.00. That’s right, $2.00 for a large french bowl.

I’m so excited, and they will all go in the perfect display cabinet I plan on finding someday….hopefully soon.

image

image

image

small p

instagram


Autumn on the porch

image

Well, it’s Fall.

I know this is a lot of people’s favorite season and I am excited for you to enjoy it!

I have already shared some of the seasonal touches around the inside of our house (some have been updated already, of course) and today I am showing a little outdoor porch space that’s dressed for fall too. This is actually a side porch on the house. Keeping in our style, it’s super casual.

I just pulled things from around the house, like a wooden bowl with apples and linens, as well as a lantern I recently gave a fresh coat of paint, etc….and put them on an old potting bench, I bought locally this past spring.

I also wrapped  some leaves around a grapevine wreath and hung it on the door (this house was built in the 50s, that door weighs as a much as I do, and has a Dutch door behind it).

And I bought some seasonal flowers.

Done.

If you are looking for low cost, low time commitment seasonal sprucing up, then this is for you. You don’t have to be a decorator, have a ton of disposable income, or even lots of free time. Just some simple touches will do.

Happy Fall Y’all!

image

image

image

image

image

image

Oh, and this is Bubba Gump, our rescued Chihuahua.

He loves sitting on this porch & insisted on being in the pictures (even though he doesn’t like the sound of the camera).

image

small p

instagram

I’m I sharing this on

The Newlywed Pilgrimage

Halloween in a jar

image

With Halloween right around the corner, I am starting to put together a few inexpensive things for the house.

This is a great season for candles and I thought, instead of buying some votive candle holders with a Halloween theme, I can just make pretty holders myself.

So, I blackened some mason jars to give them that “spooky” Halloween feel, and then added a ribbon and black votive candles.  The total cost was less than $2 (for the candles).

image

image

Here is what I did;

First I gathered a few mason jars that I had on hand, but any kind would be cute. You can even just pull some out of the recycle bin and mix & match them with different shapes and sizes for an eclectic look.

Next, I grabbed one of those outdoor, long lighters and used it to blacken the inside of the jars. You can see how the jars looked before I started, when they were clear.

image

image

It only takes a few minutes to do each jar, and you can make them as dark as you want. It will wash off when you are done using them, so you can re-purpose them for something else or throw them back into the recycle bin if that’s where you got them. No waste.

I added a touch of copper glitter to the bottoms of the jars along with the votive candles, topping them off with some black ribbon I already had.

That’s it. Cheap & easy. My favorite kind of project.

I really like them, and I’m pretty sure they are going to look even better when the candles inside are burning for Halloween in a few weeks!

image

image

image

I am am sharing this on

image

Cool weather bedding

image

With the change of seasons and the cooler weather, comes a change in duvet covers and bedding up here on the hill.

For the summer in the Master Bedroom, I used white and pale pinks in light cotton fabrics, with a Vera Wang Duvet.

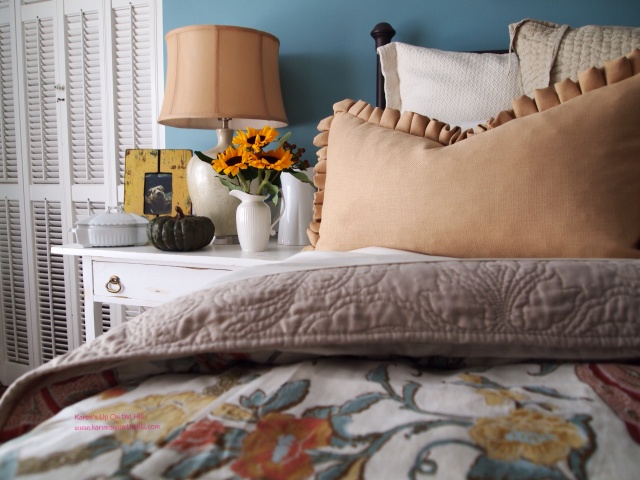
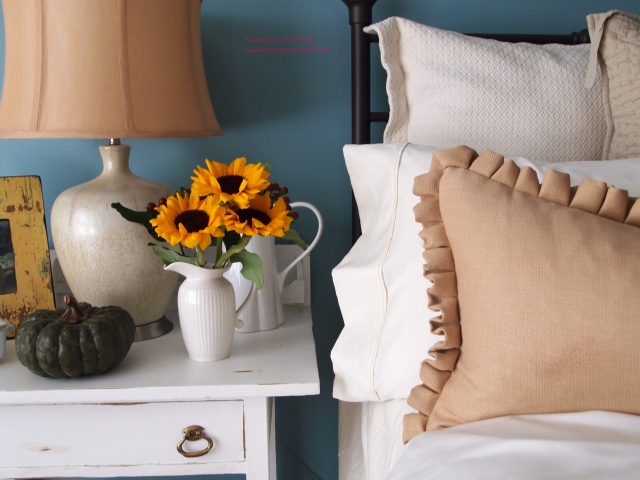
For the Fall and Winter season, I change to a heavier cotton duvet from Pottery Barn that has the golds, blues, oranges and yellows of the season. And I love layers on the bed, the more blankets & pillows the better! So cozy.

I added some simple, fresh sunflowers & a pumpkin on the nightstand to continue the Fall theme.

Everything in our home needs to be animal friendly, and I think our very casual choices of furniture and decor reflect that lifestyle.

image

image

image

A shelf in the master bedroom also gets in the spirit of Autumn, with a hand painted sign from a local antique store and some gold hydrangeas.

image

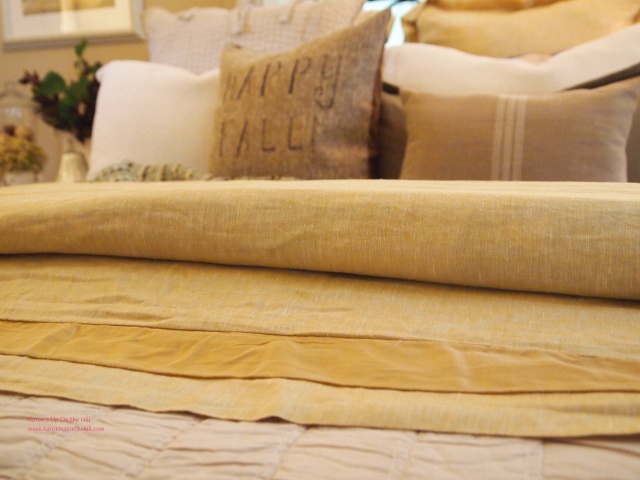
The guest room gets an update as well, with a linen duvet in a neutral color scheme and lots of pillows too.

I love Pottery barn pillow covers so much, I have them in both rooms. I really think they are a nice quality for the price, and they last forever.

The “Happy Fall” pillow I stenciled, got moved to this room for an inexpensive seasonal touch.

image

image

When I decorated this room last year, I was obsessed with linen bedding. It’s just so lovely.

But since actual French bed linen is crazy expensive, I settled on a linen blend for this room. The duvet and shams are linen on the top and a matching lining on the other side. A more cost effective choice than all linen, with the feel I was looking for.

image

I also have some twin beds in the smaller quest room downstairs, that get a change up of their own.

Simple quilts & pillow covers in Fall colors keep this room ready for quests. Although it is primarily just used by our two cats.

image

Anyhoo, thanks for stopping by. I hope you enjoyed the mini tour of our bedrooms, and perhaps got a few ideas or some inspiration  for your own home this Fall.

Karen

small p

instagram

I’m sharing this on ,

image

image